Cet article vous explique comment installer un environnement kubernetes minimal de développement via k3d en 5 minutes sur votre ordinateur sous Windows 10 et y déployer le gestionnaire de cluster Rancher v2.
Table of Contents
Prérequis
- Ordinateur sous Windows 10
- WSL 2 d’activé
- Chocolatey : un formidable gestionnaire de paquets pour installer / mettre à jour des programmes très facilement sous Windows en ligne de commande
Installation (ordre à respecter)
chocolatey
Lancez une invite de commande en administrateur :

Lancez la commande d’installation suivante :
@"%SystemRoot%\System32\WindowsPowerShell\v1.0\powershell.exe" -NoProfile -InputFormat None -ExecutionPolicy Bypass -Command "[System.Net.ServicePointManager]::SecurityProtocol = 3072; iex ((New-Object System.Net.WebClient).DownloadString('https://chocolatey.org/install.ps1'))" && SET "PATH=%PATH%;%ALLUSERSPROFILE%\chocolatey\bin"
WSL 2
Maintenant que chocolatey est installé, on va installer WSL 2 :
choco install wsl2 -ySi vous rencontrez des problèmes, les informations d’installation détaillées se trouvent sur : https://docs.microsoft.com/fr-fr/windows/wsl/install-win10
HELM et kubectl
choco install kubernetes-cli -y
choco install kubernetes-helm -y
Docker desktop
choco install docker-desktop -yEn cas de soucis avec docker-desktop, il faut lancer cette commande en administrateur et redémarrer votre ordinateur :
bcdedit /set hypervisorlaunchtype auto
K3D
choco install k3d -yOn lance powershell en administrateur en tapant dans la ligne de commande administrateur précédente :
powershellOn va créer notre cluster « k3d-rancher » :
$env:CLUSTER_NAME="k3d-rancher"
$env:RANCHER_SERVER_HOSTNAME="rancher.localhost"
$env:KUBECONFIG_FILE="${env:CLUSTER_NAME}.yaml"
k3d cluster create $env:CLUSTER_NAME --api-port 6550 --servers 1 --port 443:443@loadbalancer --wait
Pour valider que votre cluster est fonctionnel et déployé, vous pouvez lancer quelques commandes kubectl :
k3d cluster list
k3d kubeconfig get ${env:CLUSTER_NAME} > $env:KUBECONFIG_FILE
$env:KUBECONFIG=($env:KUBECONFIG_FILE)
kubectl get nodes -o wide
kubectl get pods -A
Si vous avez une erreur de proxy, lancez cette commande dans une autre fenêtre en administrateur avant d’utiliser kubectl :
kubectl proxy --port=6550Pour vérifier que traefik s’est bien déployé :
PS C:\WINDOWS\system32> kubectl get pods -n kube-system
NAME                                      READY   STATUS      RESTARTS   AGE
local-path-provisioner-5ff76fc89d-m47ms   1/1     Running     0          8m48s
metrics-server-86cbb8457f-x7fc8           1/1     Running     0          8m48s
coredns-854c77959c-bcp5j                  1/1     Running     0          8m48s
helm-install-traefik-5lq5t                0/1     Completed   0          8m48s
svclb-traefik-6zbj9                       2/2     Running     0          8m22s
traefik-6f9cbd9bd4-hd4bp                  1/1     Running     0          8m22s
PS C:\WINDOWS\system32> kubectl get deployment/traefik -n kube-system
NAME      READY   UP-TO-DATE   AVAILABLE   AGE
traefik   1/1     1            1           9m38s
Installation de Rancher
Maintenant que nous avons tous les outils nécessaires, on peut déployer Rancher facilement. Pour ce faire, on va suivre les informations indiquées sur : https://rancher.com/docs/rancher/v2.x/en/installation/k8s-install/helm-rancher/
# Install cert-manager with helm
helm repo add jetstack https://charts.jetstack.io
helm repo update
kubectl create namespace cert-manager
helm install cert-manager jetstack/cert-manager --namespace cert-manager --version v1.0.4 --set installCRDs=true --wait
kubectl -n cert-manager rollout status deploy/cert-manager

# Install Rancher
helm repo add rancher-latest https://releases.rancher.com/server-charts/latest
helm repo update
kubectl create namespace cattle-system
helm install rancher rancher-latest/rancher --namespace cattle-system --set hostname=${env:RANCHER_SERVER_HOSTNAME} --wait
kubectl -n cattle-system rollout status deploy/rancher
PS C:\WINDOWS\system32> helm install rancher rancher-latest/rancher --namespace cattle-system --set hostname=${env:RANCHER_SERVER_HOSTNAME} --wait
NAME: rancher
LAST DEPLOYED: Tue Apr  6 14:32:09 2021
NAMESPACE: cattle-system
STATUS: deployed
REVISION: 1
TEST SUITE: None
NOTES:
Rancher Server has been installed.

NOTE: Rancher may take several minutes to fully initialize. Please standby while Certificates are being issued and Ingress comes up.

Check out our docs at https://rancher.com/docs/rancher/v2.x/en/

Browse to https://rancher.localhost

Happy Containering!
Il ne vous reste plus qu’à aller sur https://rancher.localhost via la magie du DNS .localhost pour router toute requête vers le nœud k3s. Si vous obtenez une alerte que vous n’arrivez pas à contourner, vous devrez peut-être utiliser l’astuce thisisunsafe de chrome.
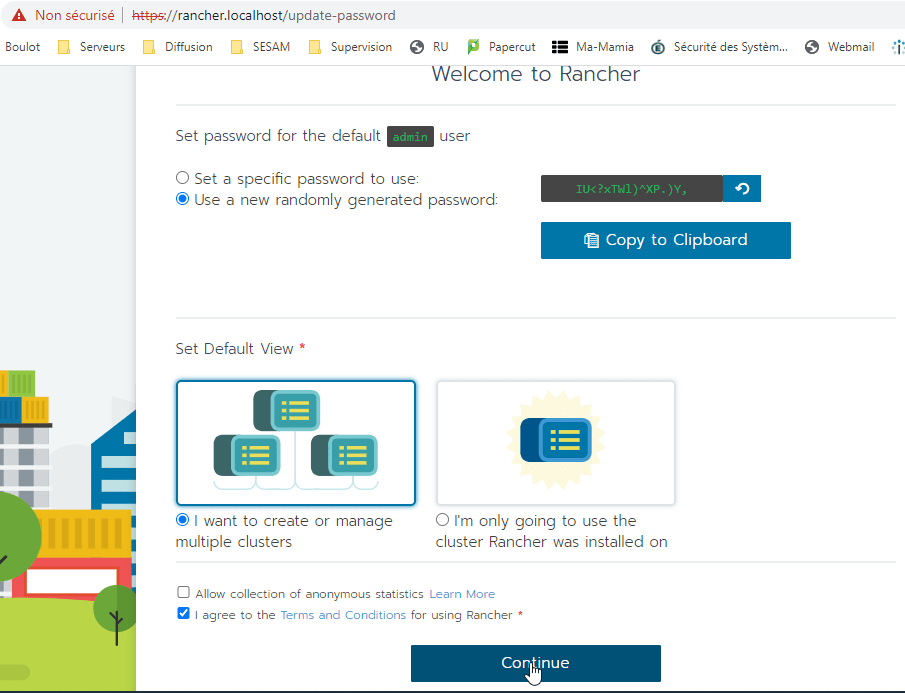
Accès initial
Laissez les valeurs par défaut et générer un nouveau mot de passe pour l’utilisateur admin.
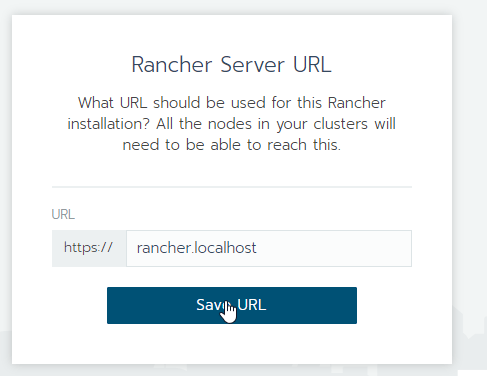
Vous pouvez modifier l’URL si nécessaire mais si c’est sur votre poste local, autant laisser celle par défaut :

Une fonctionnalité sympa sous Rancher est que vous pouvez lancer et exécuter kubectl directement dans votre navigateur en utilisant le bouton « Launch kubectl ».
Script Powershell
Un script en powershell est disponible ici, il reprend l’ensemble des commandes pour installer et déployer Rancher rapidement sous Windows, les seuls prérequis sont l’installation de chocolatey et de docker desktop :
# Default env vars
$env:CLUSTER_NAME="k3d-rancher"
$env:RANCHER_SERVER_HOSTNAME="rancher.localhost"
$env:KUBECONFIG_FILE="${env:CLUSTER_NAME}.yaml"

#Get Docker Desktop and WSL2
choco install wsl2 -y
choco install docker-desktop -y

# Get kubectl and helm
choco install kubernetes-cli -y
choco install kubernetes-helm -y

# Get k3d
choco install k3d -y

k3d cluster stop $env:CLUSTER_NAME
k3d cluster delete $env:CLUSTER_NAME

# Create the cluster
k3d cluster create $env:CLUSTER_NAME --api-port 6550 --servers 1 --port 443:443@loadbalancer --wait

k3d cluster list
k3d kubeconfig get ${env:CLUSTER_NAME} > $env:KUBECONFIG_FILE

$env:KUBECONFIG=($env:KUBECONFIG_FILE)

kubectl get nodes

# https://rancher.com/docs/rancher/v2.x/en/installation/k8s-install/helm-rancher/
# Install cert-manager with helm
helm repo add jetstack https://charts.jetstack.io
helm repo update
kubectl create namespace cert-manager
helm install cert-manager jetstack/cert-manager --namespace cert-manager --version v1.0.4 --set installCRDs=true --wait
kubectl -n cert-manager rollout status deploy/cert-manager

# Install Rancher
helm repo add rancher-latest https://releases.rancher.com/server-charts/latest
helm repo update
kubectl create namespace cattle-system
helm install rancher rancher-latest/rancher --namespace cattle-system --set hostname=${env:RANCHER_SERVER_HOSTNAME} --wait
kubectl -n cattle-system rollout status deploy/rancher


# Optionally purge your Docker env
# docker rm -f $(docker ps -qa)
# docker network prune -f
# docker volume prune -
# docker system prune -a -f
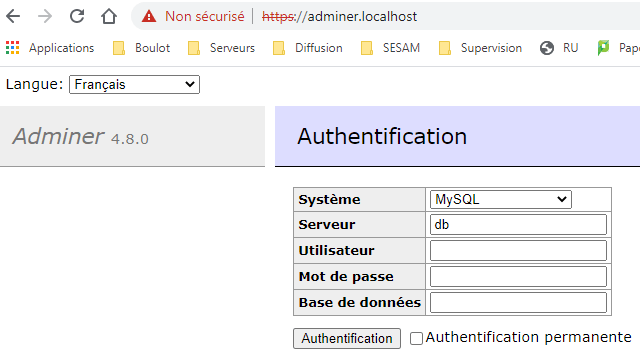
Exemple de déploiement d’une application : adminer
Création du workload
On va créer un nouveau « Workload » pour adminer :


Création de l’accès Load Balancer via Traefik
A noter : le service http pour Windows étant souvent déployé et en écoute sur le port 80, je vous conseille de déployer vos LB sur le port 443 comme dans l’exemple ci-dessous !
Rien de plus simple, il suffit d’aller dans « Load Balancing » puis « Add Ingress » :

Le workoad adminer étant en écoute sur le port 8080, on va paramétrer le LB en fonction :

Puis configurer le SSL avec le certificat par défaut auto-signé :
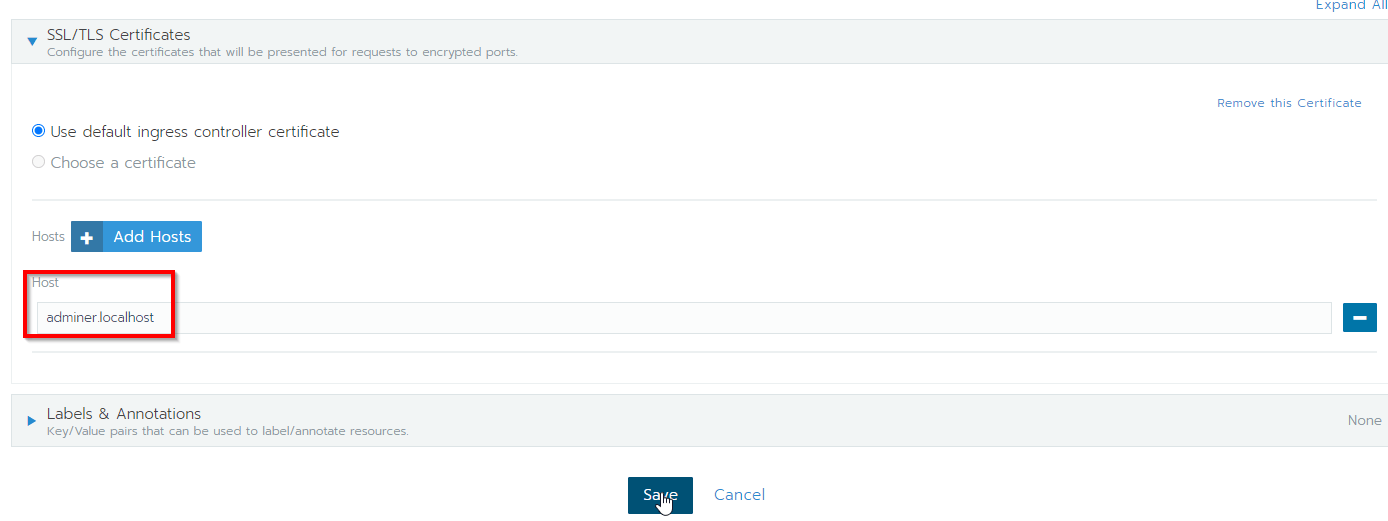
On clique sur « Save » puis il ne vous reste plus qu’à vous rendre sur l’adresse : https://adminer.localhost